User interface
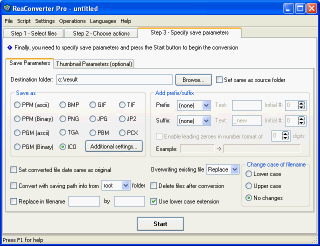
 Step 3 - Specify save parameters
In this section the user interface components of ReaConverter Pro 'Step 3 - Specify save parameters' are described.
The 3rd Step interface includes two main parts: "Save parameters" and "Thumbnail Parameters" (optional). To switch between this parts click appropriate tab.
Navigation
- You can navigate through your file area to choose your output folder using "Browse".
- Click the extension (BMP, TGA, PNG, TIF, etc.) to save selected files in.
- To save converted files with edited file name's cases use "Lower case" or "Upper case" (change case of selected files) or point "Use lower case extension" to save all files with lower case extension.
- You can also change the file names using "Add Prefix/Suffix" settings. It can be text, "numeric" or date+time, an example area will show a result.
- To rename converted files use "Replace in filename".
- Click "Thumbnail Parameters" tab to specify thumbnails features.
- To apply advanced saving settings, use "Additional Settings" that provides you with advanced saving settings for: GIF, PNG, TIFF, JPG, PCX, TGA, BMP, JP2 (JPEG 2000), Multi page PDF/GIF/TIF, output color and dpi resolution, alpha, IPTC and EXIF information.
See also:
Saving images
Saving parameters supported
How to create thumbnails